
- 분류 전체보기 (1042)

| 일 | 월 | 화 | 수 | 목 | 금 | 토 |
|---|---|---|---|---|---|---|
| 1 | 2 | 3 | 4 | 5 | 6 | 7 |
| 8 | 9 | 10 | 11 | 12 | 13 | 14 |
| 15 | 16 | 17 | 18 | 19 | 20 | 21 |
| 22 | 23 | 24 | 25 | 26 | 27 | 28 |
| 29 | 30 |
- ar vr 차이
- ANR이란
- 안드로이드 유닛테스트란
- android retrofit login
- Rxjava Observable
- 서비스 vs 쓰레드
- 멤버변수
- jvm 작동 원리
- 스택 큐 차이
- 안드로이드 유닛 테스트 예시
- 안드로이드 유닛 테스트
- 플러터 설치 2022
- 큐 자바 코드
- 안드로이드 os 구조
- 안드로이드 레트로핏 사용법
- 자바 다형성
- rxjava hot observable
- 안드로이드 레트로핏 crud
- 안드로이드 라이선스 종류
- jvm이란
- 서비스 쓰레드 차이
- 안드로이드 라이선스
- 2022 플러터 설치
- 2022 플러터 안드로이드 스튜디오
- rxjava disposable
- 객체
- rxjava cold observable
- android ar 개발
- 스택 자바 코드
- 클래스
- Today
- Total
나만을 위한 블로그
[Android Compose] BottomTabNavigation 구현하는 법 본문
Compose로 앱을 만들다가 하단 탭이 필요한 시점이 와서 구현하고, 어떻게 구현했는지 그 방법을 정리해 둔다.
먼저 sealed class로 앱에서 표시할 화면을 정의해 둔다. 꼭 sealed class가 아니라도 상관없다.
sealed class AppScreen(
    val route: String,
    @StringRes val resourceId: Int,
) {
    object Home: AppScreen("home", R.string.home)
    object Favorite: AppScreen("favorite", R.string.favorite)
    object MyPage: AppScreen("mypage", R.string.my_page)
}
이 클래스는 본인이 어떤 화면들을 만들 건지에 따라 구현이 달라지니 본인 프로젝트에 맞춰 변경한다.
그리고 BottomTabNavigation에서 선택한 탭(BottomNavigationItem)에 따라 화면을 변경할 수 있도록 하단 탭을 구현할 컴포저블 함수에 위 코드의 object들을 리스트 형태로 갖고 있는다.
곧 리팩토링할 예정이기 때문에 일단 메인 액티비티에 구현한다.
private val items = listOf(
    AppScreen.Home,
    AppScreen.Favorite,
    AppScreen.MyPage
)
이제 onCreate를 수정할 차례다. 먼저 onCreate 안에 네비게이션 컨트롤러를 만들고 관리하기 위한 rememberNavController()를 호출해서 그 결과를 navController 변수에 담는다.
rememberNavController()는 아래의 이유들 때문에 사용한다.
- 네비게이션 컨트롤러 생성, 관리 (탭을 누르면 특정 화면으로 이동시켜야 하니까. 필요하면 데이터도 같이)
- 상태 유지(다른 화면으로 이동했다가 돌아왔을 때 마지막으로 어떤 탭을 눌렀었는지 알아야 하니까)
- 네비게이션 작업 간소화(navigate(), navigateUp(), popBackStack() 등 Compose가 지원하는 함수를 사용하기 위함)
override fun onCreate(savedInstanceState: Bundle?) {
    super.onCreate(savedInstanceState)
    setContent {
        ComposeNewsAppTheme {
            val navController = rememberNavController()
            ...
다음은 화면 구조를 짜야 한다. Scaffold를 사용해서 하단 탭 생성 및 설정, 탭을 눌렀을 때 어떤 아이콘을 표시할지를 정의한다.
아래는 네비게이션 기능이 작동하는 코드다.
override fun onCreate(savedInstanceState: Bundle?) {
    super.onCreate(savedInstanceState)
    setContent {
        ComposeNewsAppTheme {
            val navController = rememberNavController()
            val context = LocalContext.current
            Scaffold(
                bottomBar = {
                    BottomNavigation {
                        val navBackStackEntry by navController.currentBackStackEntryAsState()
                        val currentDestination = navBackStackEntry?.destination
                        items.forEach { screen: AppScreen ->
                            BottomNavigationItem(
                                selected = currentDestination?.hierarchy?.any { it.route == screen.route } == true,
                                onClick = {
                                    navController.navigate(screen.route) {
                                        popUpTo(navController.graph.findStartDestination().id) {
                                            saveState = true
                                        }
                                        launchSingleTop = true
                                        restoreState = true
                                    }
                                },
                                icon = {
                                    when (screen) {
                                        AppScreen.Home -> {
                                            Icon(
                                                imageVector = Icons.Filled.Home,
                                                contentDescription = null
                                            )
                                        }
                                        AppScreen.Favorite -> {
                                            Icon(
                                                imageVector = Icons.Filled.Favorite,
                                                contentDescription = null
                                            )
                                        }
                                        AppScreen.MyPage -> {
                                            Icon(
                                                imageVector = Icons.Filled.Person,
                                                contentDescription = null
                                            )
                                        }
                                    }
                                }
                            )
                        }
                    }
                }
            ) { innerPadding ->
                NavHost(
                    modifier = Modifier.padding(innerPadding),
                    navController = navController,
                    startDestination = AppScreen.Home.route,
                ) {
                    composable(AppScreen.Home.route) { NewsScreen(context = context, newsViewModel = newsViewModel) }
                    composable(AppScreen.MyPage.route) { NewsScreen(context = context, newsViewModel = newsViewModel) }
                    composable(AppScreen.Favorite.route) { NewsScreen(context = context, newsViewModel = newsViewModel) }
                }
            }
        }
    }
}
NewsScreen()은 내가 만든 컴포저블 함수다. 이 함수 대신 표시할 화면을 그리는 컴포저블 함수를 집어넣으면 된다.
코드만 필요하다면 이 이상 볼 필요는 없다. 아래부터는 코드에 사용된 요소들을 하나씩 확인해 본다.
bottomBar = {
    BottomNavigation {
        val navBackStackEntry by navController.currentBackStackEntryAsState()
        val currentDestination = navBackStackEntry?.destination
        items.forEach { screen: AppScreen ->
            BottomNavigationItem(
                selected = currentDestination?.hierarchy?.any { it.route == screen.route } == true,
                onClick = {
                    navController.navigate(screen.route) {
                        popUpTo(navController.graph.findStartDestination().id) {
                            saveState = true
                        }
                        launchSingleTop = true
                        restoreState = true
                    }
                },
                icon = {
                    when (screen) {
                        AppScreen.Home -> {
                            Icon(
                                imageVector = Icons.Filled.Home,
                                contentDescription = null
                            )
                        }
                        AppScreen.Favorite -> {
                            Icon(
                                imageVector = Icons.Filled.Favorite,
                                contentDescription = null
                            )
                        }
                        AppScreen.MyPage -> {
                            Icon(
                                imageVector = Icons.Filled.Person,
                                contentDescription = null
                            )
                        }
                    }
                }
            )
        }
    }
}
하단 탭을 만들 것이기 때문에 Scaffold 매개변수 중 bottomBar를 사용한다.
그리고 BottomNavigation 컴포저블 함수를 호출하고, 후행 람다 안에 잡다한 설정들을 넣고 있다.
BottomNavigation이 무엇인지는 아래의 디벨로퍼를 확인한다.
androidx.compose.material | Android Developers
androidx.compose.desktop.ui.tooling.preview
developer.android.com
Bottom navigation bar를 쓰면 앱의 기본 목적지 간의 이동을 구현할 수 있다. BottomNavigation에는 각각 단일 목적지를 나타내는 여러 개의 BottomNavigationItems가 포함돼야 한다
쉽게 말해서 우리가 보통 알고 있는 하단 탭들이 모여있는 네비게이션 바의 기본 틀을 만들 수 있게 해 주는 클래스다.
이 클래스는 여러 매개변수를 갖고 있지만, 원하는 것은 기본적인 형태의 하단 탭 바기 때문에 기본형으로 사용한다.
그리고 currentBackStackEntryAsState()를 호출하고 있다.
val navBackStackEntry by navController.currentBackStackEntryAsState()
이름 그대로 현재의 NavBackStackEntry를 가져온다. 이 NavBackStackEntry를 통해 NavDestination에 접근할 수 있다.
이 처리를 통해 항목의 경로를 현재 대상 및 상위 대상의 경로와 비교해서 BottomNavigationItem이 선택됐는지 아닌지를 알 수 있다.
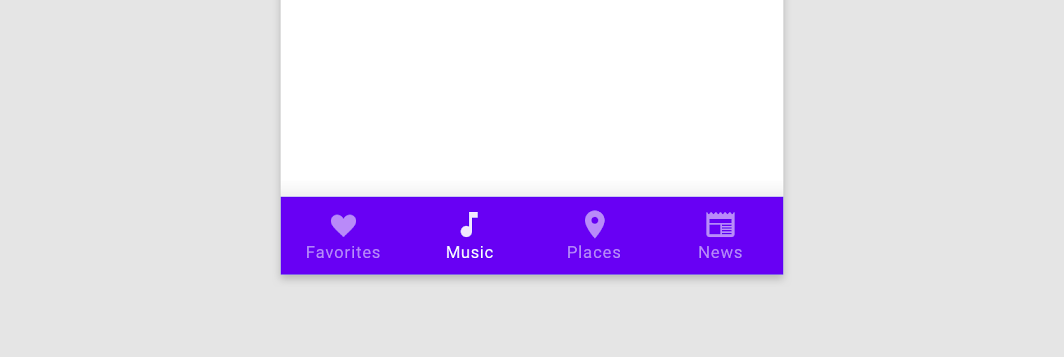
위의 예시 이미지를 기준으로, Music 탭을 선택했는데 Places 탭이 선택된 상태로 표시되는 건 이상하다. 이 경우를 막기 위해 필요한 처리라고 볼 수 있다.
그리고 바로 밑 줄에서 선택한 탭과 연결된 화면(=컴포저블 함수)을 currentDestination 변수에 담는다. 즉 유저가 지금 어떤 화면을 보고 있는지 알려주는 것이다.
val currentDestination = navBackStackEntry?.destination
그리고 앞서 정의한 앱 화면들이 담긴 리스트를 순회하면서 BottomNavigationItem을 만든다.
items.forEach { screen: AppScreen ->
    BottomNavigationItem(
        selected = currentDestination?.hierarchy?.any { it.route == screen.route } == true,
        onClick = {
            navController.navigate(screen.route) {
                popUpTo(navController.graph.findStartDestination().id) {
                    saveState = true
                }
                launchSingleTop = true
                restoreState = true
            }
        },
        icon = {
            when (screen) {
                AppScreen.Home -> {
                    Icon(
                        imageVector = Icons.Filled.Home,
                        contentDescription = null
                    )
                }
                AppScreen.Favorite -> {
                    Icon(
                        imageVector = Icons.Filled.Favorite,
                        contentDescription = null
                    )
                }
                AppScreen.MyPage -> {
                    Icon(
                        imageVector = Icons.Filled.Person,
                        contentDescription = null
                    )
                }
            }
        }
    )
}
먼저 어떤 탭이 선택됐는지 확인하는 selected 변수의 코드부터 확인한다.
selected = currentDestination?.hierarchy?.any { it.route == screen.route } == true,
currentDestination은 위에서 말한대로 현재 유저가 보고 있는 화면인 NavDestination 객체다. 그리고 hierarchy는 현재 활성화된 탭(=유저가 클릭한 탭)을 식별하는 currentDestination의 계층 구조다.
이후 any를 통해 유저가 보고 있는 화면의 route가 현재 처리하려는 화면의 route와 일치하는지 확인한다. any는 요소 하나라도 주어진 조건을 만족하는지 확인해서 Boolean 값을 리턴하는 함수다. 이후 any의 리턴값을 true와 비교해서, AppScreen.route와 일치하는 route를 가졌다면 탭에 맞는 화면이 표시된다.
onClick = {
    navController.navigate(screen.route) {
        popUpTo(navController.graph.findStartDestination().id) {
            saveState = true
        }
        launchSingleTop = true
        restoreState = true
    }
},
onClick 람다 안에선 navigate()가 사용되서 매개변수로 받은 화면으로 이동한다. 그러면서 부가적인 처리 몇 가지가 같이 수행된다.
- popUpTo() : 네비게이션 스택에서 특정 대상 이전까지의 모든 화면들을 pop한다. 네비게이션 스택이란 유저가 이동했던 화면들이 쌓여진 스택인데, 이 처리로 인해 유저가 다른 탭으로 이동할 때마다 스택을 시작 지점까지 비우고 새 화면을 표시하는데, 위의 예시 이미지에서 Favorites(처음 시작 시 기본 클릭됐다고 가정) -> Music -> Places 순으로 클릭한 다음 뒤로가기 버튼을 누르면 Favorites로 즉시 이동한다
- saveState = true : 스택에서 화면을 pop할 때 현재 화면 상태(스크롤 위치, 입력했던 데이터 등)를 저장한다
- launchSingleTop = true : 대상 화면이 이미 현재 화면의 최상단에 있다면 재생성하지 않고 현재 인스턴스를 사용한다
- restoreState = true : 이전에 saveState를 true로 설정했을 경우, 저장됐던 화면의 상태를 복원한다
saveState, launchSingleTop, restoreState는 Compose 이전에 XML로 앱을 개발할 때 매니페스트와 onCreate 등 오버라이딩 함수에서 많이 봤으니 이해가 쉬울 것이다. popUpTo() 안의 findStartDestination()의 영향으로 인해 처음 선택된 탭 이후 어떤 탭을 누르든, 뒤로가기 버튼을 누르면 즉시 홈 탭으로 이동하며 다시 한 번 뒤로가기 시 앱이 종료된다.
icon 매개변수에 쓰인 코드들은 굳이 확인하지 않아도 알 테니 생략한다. 이후 scaffold의 후행 람다 안에서 composable 함수들을 호출한다.
{ innerPadding ->
    NavHost(
        modifier = Modifier.padding(innerPadding),
        navController = navController,
        startDestination = AppScreen.Home.route,
    ) {
        composable(AppScreen.Home.route) { NewsScreen(context = context, newsViewModel = newsViewModel) }
        composable(AppScreen.MyPage.route) { NewsScreen(context = context, newsViewModel = newsViewModel) }
        composable(AppScreen.Favorite.route) { NewsScreen(context = context, newsViewModel = newsViewModel) }
    }
}
scaffold가 제공하는 padding 값을 굳이 사용할 필요는 없다. 패딩 처리가 필요하다면 modifier를 수정하면 된다.
navController에는 처음에 정의했던 rememberNavController()의 리턴값이 담긴 navController 객체를 넣고, startDestination(시작 화면)은 홈 화면으로 설정한다.
composable 함수는 NavGraphBuilder에 목적지 컴포저블 함수를 추가하는 함수다. 즉 탭을 눌렀을 때 유저한테 어떤 화면을 보여줄지를 정하는 곳으로, 자신이 만든 컴포저블 함수를 여기에 넣으면 된다.
홈, 마이페이지, Favorite 중 뭘 눌러도 NewsScreen()을 호출하기 때문에, 결과적으로 동일한 화면이 표시된다.
이렇게 하면 기본 동작은 수행하는 하단 네비게이션 바가 만들어진다. 이후 UI를 어떻게 수정하고, 탭 클릭 시 어떤 처리를 수행하며 어떤 화면을 보여줄지는 프로젝트의 성격에 따라 달라질 것이다.
'Android > Compose' 카테고리의 다른 글
| [Android Compose] Scaffold란? (0) | 2024.05.28 |
|---|---|
| [Android Compose] 상태란? (0) | 2024.04.07 |
| [Android Compose] CircularProgressIndicator 에러 해결 (0) | 2024.02.24 |
| [Android Compose] observeAsState란? (0) | 2024.02.16 |
| [Android Compose] Material 3 버전의 BottomSheet 구현하기 (0) | 2023.08.24 |

