
- 분류 전체보기 (1033)

| 일 | 월 | 화 | 수 | 목 | 금 | 토 |
|---|---|---|---|---|---|---|
| 1 | 2 | 3 | ||||
| 4 | 5 | 6 | 7 | 8 | 9 | 10 |
| 11 | 12 | 13 | 14 | 15 | 16 | 17 |
| 18 | 19 | 20 | 21 | 22 | 23 | 24 |
| 25 | 26 | 27 | 28 | 29 | 30 | 31 |
- ar vr 차이
- 2022 플러터 안드로이드 스튜디오
- 자바 다형성
- 멤버변수
- 스택 큐 차이
- 클래스
- 안드로이드 레트로핏 crud
- 서비스 쓰레드 차이
- 안드로이드 라이선스 종류
- android ar 개발
- jvm 작동 원리
- 스택 자바 코드
- 플러터 설치 2022
- 안드로이드 레트로핏 사용법
- rxjava disposable
- ANR이란
- 큐 자바 코드
- 안드로이드 유닛 테스트
- jvm이란
- 2022 플러터 설치
- 안드로이드 라이선스
- 서비스 vs 쓰레드
- Rxjava Observable
- rxjava hot observable
- 객체
- 안드로이드 유닛 테스트 예시
- 안드로이드 유닛테스트란
- 안드로이드 os 구조
- android retrofit login
- rxjava cold observable
- Today
- Total
나만을 위한 블로그
[Android] EncryptedSharedPreference란? 본문
쉐어드 프리퍼런스는 보통 알람 설정같은 T/F 값 등의 간단한 값을 저장할 때 쓰곤 한다.
그러나 서버에서 받은 인증 토큰을 저장해야 하는 경우도 있는데, 이 때는 복잡한 암호화, 복호화 함수를 따로 유틸 함수로 만든 뒤 사용한다. 이 방법의 단점은 처음 로그인할 때 암호화 과정이 너무 느릴 수도 있다는 것이다.
그래서 다른 방법을 찾아보다가 제목에 쓴 EncryptedSharedPreference라는 걸 알게 됐다.
https://developer.android.com/topic/security/data?hl=ko
Android 개발자 | Android Developers
더 안전하게 데이터 사용 Android Jetpack의 구성요소 보안 라이브러리는 저장 데이터 읽기 및 쓰기와 관련된 보안 권장사항의 구현과 키 생성 및 인증을 제공합니다. 라이브러리는 빌더 패턴을 사
developer.android.com
EncryptedSharedPreference는 2019년 제트팩 라이브러리에 포함된 클래스로 SharedPreference를 매핑하는 클래스다. 때문에 모든 쉐어드 프리퍼런스 함수들을 사용할 수 있다.
일반 쉐어드와 다른 점이라면 저장할 때 자동으로 AES256 알고리즘을 사용한 암호화를 진행해서 저장하고, 가져올 때는 암호화된 데이터를 복호화해서 갖다준다. 그런데도 속도는 빠르고 사용법도 매우 간단해서 유용한 라이브러리라고 생각된다.
사용법은 먼저 앱 수준 gradle에 의존성 하나를 넣는다.
implementation "androidx.security:security-crypto:1.0.0"
그리고 테스트하기 위한 XML 파일을 만든다. 이 포스팅에서도 데이터바인딩을 사용한다.
<?xml version="1.0" encoding="utf-8"?>
<layout xmlns:android="http://schemas.android.com/apk/res/android"
    xmlns:app="http://schemas.android.com/apk/res-auto"
    xmlns:tools="http://schemas.android.com/tools">

    <androidx.constraintlayout.widget.ConstraintLayout
        android:layout_width="match_parent"
        android:layout_height="match_parent"
        tools:context=".encryptedShared.MainActivity">

        <EditText
            android:id="@+id/key_edittext"
            android:layout_width="match_parent"
            android:layout_height="wrap_content"
            android:layout_marginTop="80dp"
            app:layout_constraintStart_toStartOf="parent"
            app:layout_constraintEnd_toEndOf="parent"
            app:layout_constraintTop_toTopOf="parent"
            android:hint="key 입력"/>

        <EditText
            android:id="@+id/value_edittext"
            android:layout_width="match_parent"
            android:layout_height="wrap_content"
            android:layout_marginTop="40dp"
            app:layout_constraintStart_toStartOf="parent"
            app:layout_constraintEnd_toEndOf="parent"
            app:layout_constraintTop_toBottomOf="@+id/key_edittext"
            android:hint="value 입력"/>

        <androidx.appcompat.widget.AppCompatButton
            android:id="@+id/save_button"
            android:layout_width="wrap_content"
            android:layout_height="wrap_content"
            android:layout_marginTop="40dp"
            app:layout_constraintStart_toStartOf="parent"
            app:layout_constraintEnd_toEndOf="parent"
            app:layout_constraintTop_toBottomOf="@+id/value_edittext"
            android:text="저장"/>

        <androidx.appcompat.widget.AppCompatButton
            android:id="@+id/get_button"
            android:layout_width="wrap_content"
            android:layout_height="wrap_content"
            android:layout_marginTop="40dp"
            app:layout_constraintStart_toStartOf="parent"
            app:layout_constraintEnd_toEndOf="parent"
            app:layout_constraintTop_toBottomOf="@+id/save_button"
            android:text="불러오기"/>

        <TextView
            android:id="@+id/show_result_textview"
            android:layout_width="wrap_content"
            android:layout_height="wrap_content"
            android:layout_marginTop="40dp"
            app:layout_constraintStart_toStartOf="parent"
            app:layout_constraintEnd_toEndOf="parent"
            app:layout_constraintTop_toBottomOf="@+id/get_button"
            android:text="여기에 가져온 값이 출력"/>

    </androidx.constraintlayout.widget.ConstraintLayout>

</layout>
그리고 메인 액티비티 코틀린 파일을 작성한다. 주의할 것이라면 아래 코드를 전체 복사하는 경우 R.layout.activity_main2라고 돼 있기 때문에 데이터바인딩 쪽에서 에러가 날 것이다. 숫자 2만 지우고 재빌드하면 정상 작동한다.
import android.os.Bundle
import androidx.appcompat.app.AppCompatActivity
import androidx.databinding.DataBindingUtil
import androidx.security.crypto.EncryptedSharedPreferences
import androidx.security.crypto.MasterKeys
import com.example.kunnykotlin.R
import com.example.kunnykotlin.databinding.ActivityMain2Binding

class MainActivity : AppCompatActivity() {

    private lateinit var binding: ActivityMain2Binding

    override fun onCreate(savedInstanceState: Bundle?) {
        super.onCreate(savedInstanceState)
        binding = DataBindingUtil.setContentView(this, R.layout.activity_main2)

        val keyGenParameterSpec = MasterKeys.AES256_GCM_SPEC
        val masterKeyAlias = MasterKeys.getOrCreate(keyGenParameterSpec)
        val sharedPreferences = EncryptedSharedPreferences.create(
            "encryptedShared",
            masterKeyAlias,
            this,
            EncryptedSharedPreferences.PrefKeyEncryptionScheme.AES256_SIV,
            EncryptedSharedPreferences.PrefValueEncryptionScheme.AES256_GCM
        )

        binding.run {
            saveButton.setOnClickListener {
                val key = keyEdittext.text.toString()
                val value = valueEdittext.text.toString()
                sharedPreferences.edit().putString(key, value).apply()
            }

            getButton.setOnClickListener {
                val storedValue = sharedPreferences.getString(keyEdittext.text.toString(), "")
                showResultTextview.text = storedValue
            }
        }
    }
}
EncryptedSharedPreference를 사용하려면 먼저 MasterKeys라는 객체를 만들어야 한다.
이 때 AES256_GCM_SPEC을 붙이는데 위에서 말한대로 AES256은 암호화 알고리즘 중 하나다. 궁금한 사람은 AES256에 대해서 공부해보자.
masterKey를 만든 다음 이 키와 일치하는 키가 있으면 가져오고, 없으면 생성한 다음 EncryptedSharedPreferences 객체를 만든다. 첫 번째 문자열은 핸드폰에 저장될 쉐어드 파일의 이름을 넣으면 된다. 4, 5번 인자에도 AES256을 넣어주는데 키밸류를 AES256 방식으로 암호화할 것이기 때문에 AES256으로 초기화하는 거라고 생각된다.
그 다음 저장 버튼을 누르면 editText에 입력된 값들을 저장하고, 불러오기 버튼을 누르면 저장된 값들을 불러온다.
위 코드를 실행하고 쉐어드 파일을 확인해보면 아래와 같이 값이 저장된 게 보일 것이다.
<?xml version='1.0' encoding='utf-8' standalone='yes' ?>
<map>
    <string name="__androidx_security_crypto_encrypted_prefs_key_keyset__">12a701b350ac0a9aea853e700c9a6f5e5cb7f8a3af577d311bd2fff01724ab60b096ea87e0de7b9aff8852c9d3f164ca9afab9ac2140e7e0dec6f3358d7c747f06bd48a547c62c51c7d3f0b97a26eeb0e2f3bb88536c970406f26039770b484edbbcbe00f4e78275e75efd7ce682cf1e59e28fb19406815ffdf9e161dced24e508d2cfd86b724b1e77b3a7f1dfeac00f103821a8fc0336da2409f4d8ba3fe3a9d9fee2d37a40b805e1f11a4208caeaa971123b0a30747970652e676f6f676c65617069732e636f6d2f676f6f676c652e63727970746f2e74696e6b2e4165735369764b6579100118caeaa9712001</string>
    <string name="__androidx_security_crypto_encrypted_prefs_value_keyset__">1288018fbc15917a07076d3838566c090261062311ad9d385f799a367ea58d69757310f4bfb204119298246a606823e69b1b23f176c2742c03d4f4da197ebb8332856396beb31cfc6683e78932abfc1e4377634e64df5e49b878a3030abe7cf63bfe45cf10760a1d72db175ffc57ddb36f2c8358682dc3d32beb80267a416f7ff57979d6792987bff51f251a4408c1ebcf8b07123c0a30747970652e676f6f676c65617069732e636f6d2f676f6f676c652e63727970746f2e74696e6b2e41657347636d4b6579100118c1ebcf8b072001</string>
    <string name="AQ4qdUoMRm3rWKQxVfsaXWT0sDvnAxkQFw==">AXFz9cHUD7Ly+nISGRUAgnsSsh37/SDFLfdwOc4fGLZ2HNiZy/XJifVzxlqjilhvTrk=</string>
</map>
1, 2번 문자열을 제외하고 3번째 문자열이 신기한 형태로 존재하는 걸 볼 수 있다.
이것이 위에서 editText에 뭔가를 입력하고 저장 버튼을 눌러 저장한 값이다. AES256 방식으로 초기화되서 저렇게 나오는 것이다.
불러오기 버튼을 누를 경우 아래와 같은 화면이 보인다.
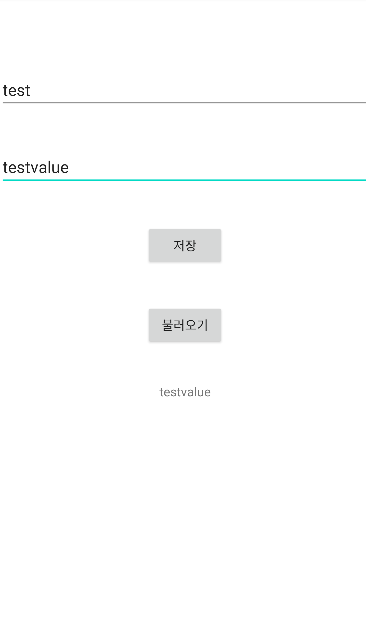
좀 더 긴 문자열들을 입력해도 가져오는 시간이 느낌상으로도 매우 빠르다. 얼마나 빠른지 궁금하다면 로그로 찍어서 확인해보자.
'Android' 카테고리의 다른 글
| [Android] Navigation Component란? Navigation 사용법 (0) | 2022.06.19 |
|---|---|
| [Android] Ktor란? (0) | 2022.06.12 |
| [Android] 코틀린으로 구글 로그인 구현하기 (0) | 2022.06.09 |
| [Android] 안드로이드 스튜디오 범블비에서 SHA-1 키 빨리 확인하는 법 (0) | 2022.06.09 |
| [Android] 코틀린과 ViewPager2로 미리보기 + 자동 무한 스크롤 기능 구현하는 법 (0) | 2022.06.08 |


